关于 Android Q 的 Scoped Storage
如果你还不了解 Android Q 的 Scoped Storage,那么请先自行详细阅读官方文档。
Scoped Storage 的好处自不用说,以下会从两个角度来考虑这个新变化所带来的影响:
- 媒体生产者
- 媒体消费者
NOTE:
Storage Access Framework(SAF)不在本文讨论范围内,主要是考虑到知乎可能不会用上。
媒体生产者
举个简单的例子,得到一个 Bitmap,需要把它写入文件并能被检索:
val file = File(Environment.getExternalStoragePublicDirectory(
        Environment.DIRECTORY_PICTURES), "${System.currentTimeMillis()}.jpg")
val fos = FileOutputStream(file)
fos.use {
    bitmap.compress(Bitmap.CompressFormat.JPEG, 100, it)
}
val intent = Intent(Intent.ACTION_MEDIA_SCANNER_SCAN_FILE)
intent.data = Uri.fromFile(file)
context.sendBroadcast(intent)
这段代码在非 Android Q 上没问题,主要做了以下事情:
- 在 Public 的 Pictures 下创建以当前时间戳为名字的文件;
- 把 Bitmap 写进去;
- 使用
ACTION_MEDIA_SCANNER_SCAN_FILE通知系统更新媒体数据库;
在 Android Q 上,代码还是照常跑,看起来一切没有变化,但实际上,因为这个 file 的目录是在你自己 app 的沙箱里,别的 app 是无法访问的,即便拿到 DATA 里的 filePath,尝试去读取的时候还是会出问题。
官方的一个推荐的做法是直接使用 MediaStore 插入媒体到数据库。
事实上 MediaStore.Images.Media 就有一个 insertImage 的方法,看起来很简单,但是点你点进源码一看:
public static final String insertImage(ContentResolver cr, String imagePath,
        String name, String description) throws FileNotFoundException {
    // Check if file exists with a FileInputStream
    FileInputStream stream = new FileInputStream(imagePath);
    try {
        Bitmap bm = BitmapFactory.decodeFile(imagePath);
        String ret = insertImage(cr, bm, name, description);
        bm.recycle();
        return ret;
    } finally {
        try {
            stream.close();
        } catch (IOException e) {
        }
    }
}
整个 Bitmap 都 decode 出来了,这是为啥呢?
public static final String insertImage(ContentResolver cr, Bitmap source,
                                       String title, String description) {
    ContentValues values = new ContentValues();
    values.put(Images.Media.TITLE, title);
    values.put(Images.Media.DESCRIPTION, description);
    values.put(Images.Media.MIME_TYPE, "image/jpeg");
    Uri url = null;
    String stringUrl = null;    /* value to be returned */
    try {
        url = cr.insert(EXTERNAL_CONTENT_URI, values);
        if (source != null) {
            OutputStream imageOut = cr.openOutputStream(url);
            try {
                source.compress(Bitmap.CompressFormat.JPEG, 50, imageOut);
            } finally {
                imageOut.close();
            }
            long id = ContentUris.parseId(url);
            // Wait until MINI_KIND thumbnail is generated.
            Bitmap miniThumb = Images.Thumbnails.getThumbnail(cr, id,
                    Images.Thumbnails.MINI_KIND, null);
            // This is for backward compatibility.
            Bitmap microThumb = StoreThumbnail(cr, miniThumb, id, 50F, 50F,
                    Images.Thumbnails.MICRO_KIND);
        } else {
            Log.e(TAG, "Failed to create thumbnail, removing original");
            cr.delete(url, null, null);
            url = null;
        }
    } catch (Exception e) {
        // ...
    }
    // ...
    return stringUrl;
}
可以看到主要还是帮你生成缩略图,而且注意一下这行代码:
source.compress(Bitmap.CompressFormat.JPEG, 50, imageOut);
以 JPEG 的格式保存图片,而且质量只有 50%...
所以不是很明白官方的这个做法用意如何,既容易 OOM,保存的质量又低。不过正如文档这里说的,我们自己手动插一行媒体也是可以的,一些要求:
- 至少提供
DISPLAY_NAME和MIME_TYPE - 针对 Android Q,可以设置
PRIMARY_DIRECTORY或者SECONDARY_DIRECTORY - 不要自己写
DATA
假设你有一个已经在沙箱里的文件,想把它保存到 SharedCollection 里,你可以这么做:
fun insertImage(cr: ContentResolver, filePath: String, title: String?, desc: String?): Uri? {
    val file = File(filePath)
    if (!file.exists()) {
        return null
    }
    val values = ContentValues()
    values.put(MediaStore.Images.Media.DISPLAY_NAME, file.name)
    values.put(MediaStore.Images.Media.TITLE, title)
    values.put(MediaStore.Images.Media.DESCRIPTION, desc)
    values.put(MediaStore.Images.Media.MIME_TYPE, "image/jpeg") //todo extract mime types
    values.put(MediaStore.MediaColumns.SIZE, file.length())

    val uri = cr.insert(MediaStore.Images.Media.EXTERNAL_CONTENT_URI, values) ?: return null
    // Since we want to persist the file to shared collection,
    // we do not manually insert the DATA column.
    // NOTE: the bucket id & name is auto generated by system, thus
    // by doing this, you will see the images in Picture/ dir.
    val transferred = transfer(cr, File(filePath), uri)
    if (!transferred) {
        cr.delete(uri, null, null)
        return null
    }
    return uri
}

private fun transfer(cr: ContentResolver, srcFile: File, outUri: Uri): Boolean {
    val outputFileDescriptor = cr.openFileDescriptor(
            outUri, "w")?.fileDescriptor ?: return false
    val inputFileDescriptor = cr.openFileDescriptor(
            Uri.fromFile(srcFile), "r")?.fileDescriptor ?: return false
    try {
        val fos = FileOutputStream(outputFileDescriptor)
        val fis = FileInputStream(inputFileDescriptor)
        val outputChannel = fos.channel
        val inputChannel = fis.channel
        outputChannel.use { oc ->
            inputChannel.use { ic ->
                ic.transferTo(0, ic.size(), oc)
            }
        }
    } catch (e: Exception) {
        return false
    }
    return true
}
当然如果你不希望先保存成文件,然后再保存到 SharedCollection,那么在插入数据库后,直接使用 ContentResolver 的 openFileDescriptor 方法打开 FileDescriptor 然后创建流写入就好了。
不过这样有一个缺点,插入的媒体文件的 bucket 无法指定。根据文档说:
/**
 * The bucket id of the image. This is a read-only property that
 * is automatically computed from the DATA column.
 * <P>Type: TEXT</P>
 */
public static final String BUCKET_ID = "bucket_id";
bucket 是从 DATA 里读取的,因此目前无法指定保存的 bucket,也就是说,用户只能在 Pictures 下看见刚刚保存的图片。
此外,经过测试,通过这样方式保存后的文件(在非 Android Q 上看),名字并不是我们制定的 DISPLAY_NAME,而是写死的 "${System.currentTimeMillis()}.jpg" 这样的形式,这会导致一些只根据文件后缀来解码图片的图片库会无法播放 GIF (心累啊)。
目前建议区分 Q 跟 非 Q 设备来做适配(题外话:目前 Q beta 里,对于非 target 到 API 29 的 app,android.os.Build.VERSION.SDK_INT 这个值是 28,也就是你根本不知道是不是在 Q 下)。
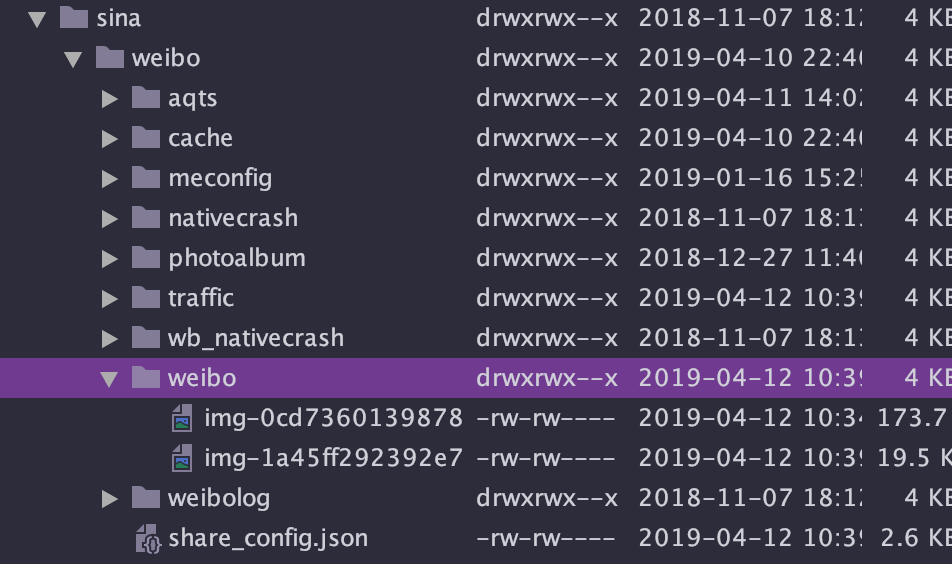
NOTE
目前在 Pixel 2 with Android Q Beta 2 上进行测试,似乎位于 /sdcard/xxx 目录下的,依然能被 MediaStore 检索到(比如微博保存图片的目录即使在 /sdcard/sina/weibo/weibo 下的)。目前我认为可能是个 bug,在后续的 Android 版本里可能就修复了,请不要利用这个来越过沙箱。
媒体消费者
如果你已经在使用 MediaStore 来读取媒体文件,那么而一切都好。但是相信有一小部分 app (比如音频和视频播放相关的)会遍历某个目录下的文件来获取文件,但是这样显然只能获取自己沙箱里的文件。
值得注意的是,去读取外部媒体文件的时候,不要再使用获得文件路径然后再去读了。应该使用 ContentResolver 里的方法:
context.contentResolver.openFileDescriptor(uri, "r")
获取到的文件路径,从原来的:
/storage/emulated/0/DCIM/Camera/test1.jpg
变为
/mnt/content/media/external/images/media/26500
尽管经试验后 BitmapFactory.decodeFile() 依然能成功解码,但还是依然推荐使用 contentResolver 的方式打开一个流,然后再用 BitmapFactory 或者 P 上的 ImageDecoder 。
此外可以看到,已经不能从文件路径来判断文件类型了,如果需要提前获取文件的 MimeType,建议:
- 读取数据库里的 MIME_TYPE,但此方法可能不太可靠,可以 fallback 到下一个方法
- 从文件头读取格式
Subscribe to JuniperPhoton's Blog
Get the latest posts delivered right to your inbox